
Introduction
rtAmazon S3 allows site admin to move and/or store WordPress media uploads to Amazon S3 Bucket. It works for all the WordPress media library images and other types of files. This plugin works fine with rtMedia plugin also.
How to install rtAmazon S3
Perform the following steps to install rtAmazon s3 plugin:
-
Download rtAmazon S3 plugin from the My Account section
-
Go to WordPress site dashboard and navigate to
Plugins > Add New > Upload. -
Select the
rtamazon-s3.zipfile from your computer and click upload. -
Click Install Now to install the plugin. Then, click the Activate Plugin link, to activate the plugin.
How to use
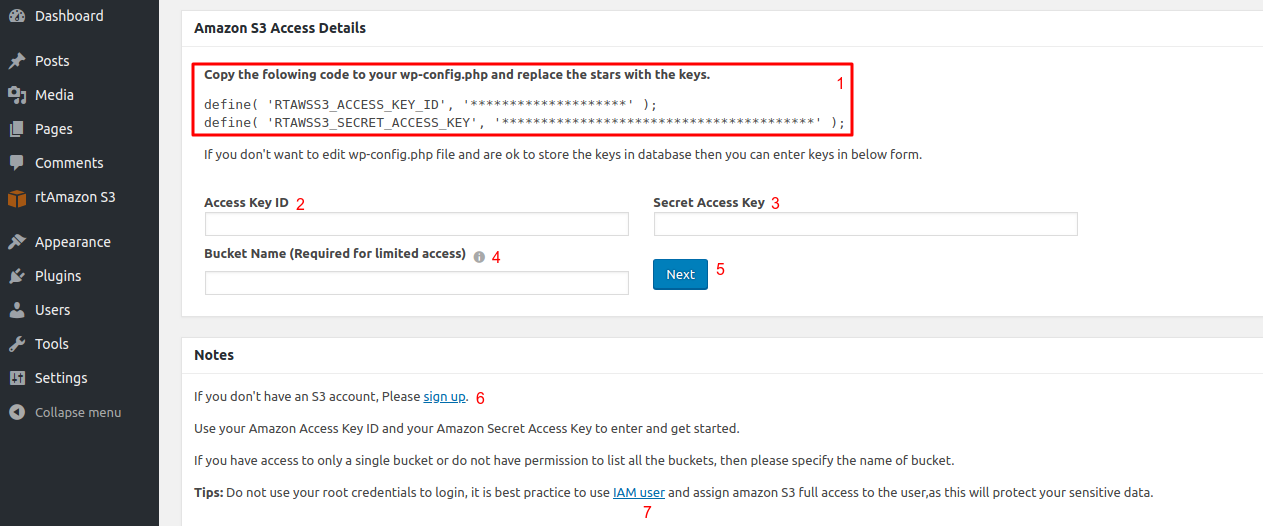
Settings
-
You can define your
Access Key IDandSecret Access Keyinwp-config.phpfile. You can read more about wp-config options here. -
Enter
Amazon Access Key ID -
Enter
Amazon Secret Access Key - If the specified
Access Key IDandSecret Access Keyaccount has single bucket permission, then providing bucket name here is required. -
Click
Nextto get started. Note: You can delete existingAccess Key IDandSecret Access Keyby clearing both the text boxes and clicking this button. -
If you don’t have an account then you can Sign Up to Amazon S3
-
Do not use your root credentials to login, it is best practice to use IAM user and assign amazon s3 full access to the user,as this will protect your sensitive data.
WP Config Options
You can directly add the settings right from your wp-config.php file. It will be more secure and only server team can do required changes. Site admin can’t change any settings related to AWS S3 account and plugin settings.
The following options are available for general use:
-
Access Keys
Access keys consist of an Access Key ID and Secret Access Key, which are used to sign programmatic requests that you make to AWS. You can read more about it here.
Replace access_key_id and secret_access_key in the example code below with your Amazon Access Key ID andAmazon Secret Access Key respectively.
define( 'RTAMAZON_S3_ACCESS_KEY_ID', 'access_key_id' );define( 'RTAMAZON_S3_SECRET_ACCESS_KEY', 'secret_access_key' ); -
RTAMAZON_S3_BUCKET_NAME
To upload your data (photos, videos, documents etc.), you first create a bucket in one of the AWS regions. You can read rules for creating a bucket here.
After creating a bucket replace bucket_name in the example code below with the Bucket you have just created or you want to access any.
define( 'RTAMAZON_S3_BUCKET_NAME', 'bucket_name' ); -
RTAMAZON_S3_VIRTUAL_FOLDER_NAME
This option allows you to store your objects under folders on s3. For example if the name of your input folder is test, objects are stored under test folder, if folder name is test/sample objects are stored under sample folder which is a folder under test and so on.
Replace virtual_folder in the example code below with the Folder you want.
define( 'RTAMAZON_S3_VIRTUAL_FOLDER_NAME', 'virtual_folder' ); -
RTAMAZON_S3_DELETE_LOCAL_MEDIA
This option allows you to delete local server media after they have been successfully uploaded to your S3 account. You just need to set it TRUE. And if you don’t want then you can remove this option or simply set it to FALSE. It is Strongly Not Recommended to delete local server media.
For example use below code:
define( 'RTAMAZON_S3_DELETE_LOCAL_MEDIA', 'TRUE' ); RTAMAZON_S3_FILE_URLS
There are four ways to serve media URL:
-
rtawss3_wp_url: WordPress Media URL, i.e.,
http://site.com/wp-content/uploads/2015/06/photo.jpg.You can use below code:
define( 'RTAMAZON_S3_FILE_URLS', 'rtawss3_wp_url' ); -
rtawss3_subdomain: Bucket Name as Subdomain, i.e.,
http://bucket-name.s3.amazonaws.com/wp-content/uploads/2015/06/photo.jpg.You can use below code:
define( 'RTAMAZON_S3_FILE_URLS', 'rtawss3_subdomain' ); -
rtawss3_path: Bucket Name in Path, i.e.,
http://s3.amazonaws.com/bucket-name/wp-content/uploads/2015/06/photo.jpg.You can use below code:
define( 'RTAMAZON_S3_FILE_URLS', 'rtawss3_path' ); -
rtawss3_custom: Custom Domain. This option is useful for CDN, CloudFront, etc.
You can use below code:
define( 'RTAMAZON_S3_FILE_URLS', 'rtawss3_custom' );Note: If this option is set to rtawss3_custom, then RTAMAZON_S3_CUSTOM_DOMAIN_NAME option must be set. For example if you set
define( 'RTAMAZON_S3_CUSTOM_DOMAIN_NAME', 'example.com' );then your media URL will becomehttp://example.com/wp-content/uploads/2015/06/photo.jpg.
-
-
RTAMAZON_S3_SYNC_UPLOAD
This option enables you to sync upload media files to S3 as they are uploaded from media library, blog post or rtMedia plugin. You just need to set it TRUE. And if you don’t want then you can remove this option or simply set it to FALSE.
define( 'RTAMAZON_S3_SYNC_UPLOAD', 'TRUE' ); -
RTAMAZON_S3_ALLOW_BUCKET_CREATION
This option allows you to give access for creating a bucket. If you want to allow to create a bucket, simply set it TRUE. And if you don’t want then set it FALSE or remove this option.
define( 'RTAMAZON_S3_ALLOW_BUCKET_CREATION', 'TRUE' ); -
RTAMAZON_S3_SHOW_ADMIN_SETTINGS_PAGE
This option is for showing Settings page. If set to TRUE, settings page will be displayed and if set to FALSE, settings page will not be displayed.
define( 'RTAMAZON_S3_SHOW_ADMIN_SETTINGS_PAGE', 'TRUE' ); -
RTAMAZON_S3_SHOW_ADMIN_MENU
This option is for showing Menus. If set to TRUE, menus will be displayed and if set to FALSE, menus will not be displayed.
define( 'RTAMAZON_S3_SHOW_ADMIN_MENU', 'TRUE' ); -
RTAMAZON_S3_BUCKET_REGION
This option is for setting bucket region. If your bucket is from US Standard region then you don’t need to set this option. You can read more about region here.
For example if you want to set region as US West (Oregon) then use below code:
define( 'RTAMAZON_S3_BUCKET_REGION', 'us-west-2' );
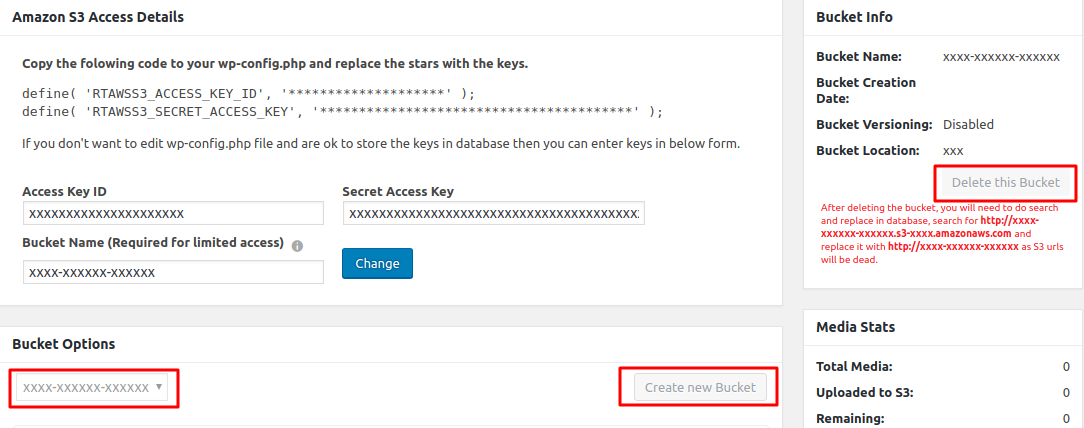
Bucket Selection
After successfully logged in, a dropdown will appear to select Bucket selection page.

-
You can see your
Access Key IDandSecret Access Key -
If you want to change your
Access Key IDandSecret Access Keythen enter new details and click on Changebutton -
You can see you
Amazon S3 Buckets. -
If you want to add new bucket, click on
Create new Bucketbutton
Create Bucket
After clicking on Create new Bucket, you will be able to see Bucket Creation Popup

-
Enter
Bucket Name -
Select
Region -
Click
Create Bucketbutton. -
You can see
Rules for creating Bucket -
If you don’t want to create a Bucket then simply
Closethe popup.
Bucket Settings
After Selecting a Bucket or Creating a Bucket you can see Selected Bucket's or Created Bucket's Settings.

-
Upload media files to Virtual Folder on Amazon S3 Bucket. For example if the name of input folder is test, media are stored under test folder, if folder name is
test/sample, media are stored under sample folder which is a folder undertest and so on. -
You can delete local media files after they have been successfully uploaded to your S3 Bucket. If you enable this option then uploaded files are served with their
S3 URL. Strongly Not Recommended! -
You can serve media URL with different options:
-
WordPress Media URL:
http://sp.com/wp-content/uploads/2015/06/photo.jpg -
Bucket Name as Subdomain:
http://bucket-name.s3.amazonaws.com/wp-content/uploads/2015/06/photo.jpg -
Bucket Name in Path:
http://s3.amazonaws.com/bucket-name/wp-content/uploads/2015/06/photo.jpg -
Custom Domain: This option is useful for CDN, CloudFront, etc. For example if you enter example.com in the textbox, media URL will become
http://example.com/wp-content/uploads/2015/06/photo.jpg
Note: This will affect only new uploads.
-
-
You can directly copy uploaded media files to S3 Bucket as they are uploaded from media library, blog post or rtmedia plugin.
- Showing object list on a page is very resource utilising task, it may freeze the page. You can disable bucket object listing through this setting.
-
Save Settings after changes
You can see Bucket Info like:
-
Bucket Name
-
Bucket Owner
-
Bucket Creation Date
-
Bucket Versioning
-
Bucket Location
-
-
You can Delete Bucket directly from here. If there are objects in the Bucket then you need to Delete Objects first.
-
You can see Media Stats
-
You can upload all the remaining media which are not uploded to Amazon S3 Bucket. Just click on Upload All button.
- You can change the Bucket, if you want to see other Bucket details.
Single Bucket Support
Added in v1.6.0, rtAmazon-S3 provides support for IAM account having permission to only a specific bucket. The account must have full permission to that specific bucket.
If the specified Access Key ID and Secret Access Key has single bucket permission, then Create new Bucket and Delete this Bucket buttons will be disabled.
The Select Bucket list will be disabled as there is no permission to list other buckets.
Bucket Objects

-
If you want to list the latest bucket objects then click on Refresh Bucket Object List
-
Select Object
Bulk Actions
-
Download-> You can download single object or multiple objects by selecting Download from Bulk Actions. -
Delete-> You can directly delete single object or multiple objects from the bucket by selecting Delete from Bulk Actions. -
Move-> First you have to select media and then select Move from Bulk Actions. After that select Destination Bucket.
-
-
Click
ApplyAfter select bulk action. -
Paginationfor bucket objects
Upload All
You will be able to see Remaining media count which are not uploaded to Amazon S3 Bucket.

After Upload complete, click the link to navigate to rtAmazon S3 Settings as shown below

Upload Media
You can upload selected media to Amazon S3 Bucket.

-
Select the media you want to Upload to S3 Bucket
-
Click on Upload
Media Library
You can upload media directly from WordPress’ Media Library to S3 Bucket or see the uploaded media with their S3 URL

-
You can see
Admin Noticeto upload remaining media to S3 Bucket. -
New column to see/upload media i.e.,
S3 URL -
Uploadto S3 Bucket -
Linkto see the uploaded media -
You can
Bulk Uploadby selecting multiple media and selectUpload to S3from Bulk Actions DropDown.
Reupload All
You can reupload all the media from your site to your amazon s3 account.

After clicking on reupload link, you will be redirected to reupload all media page. On that page you just need to press Startbutton to start upload process.
rtAmazon S3 CLI
New! rtAmazon-s3 CLI added from version v1.4. With the rtAmazon-s3 CLI you can upload the old or previously uploaded media to the S3 bucket.
NOTE: Before using the rtAmazon-s3 CLI make sure you have WP-CLI installed on your server.
The available CLI commands are:
- The following command will list the stats of the media uploaded to your site
# wp rtamazon media count - The following command will upload all the media to the s3 bucket.
# wp rtamazon media uploadUploading 2 media to 'your-s3-test' bucket ... Success: 1/5 ID 15 - media-name-1 uploaded in 2.77 seconds Success: 2/5 ID 14 - media-name-2 uploaded in 3.22 seconds Success: 3/5 ID 13 - media-name-3 uploaded in 1.45 seconds Success: 4/5 ID 12 - media-name-4 uploaded in 5.58 seconds Success: 5/5 ID 11 - media-name-5 uploaded in 2.84 seconds - The following command will only upload the remaining media which are not already uploaded to the s3 bucket.
# wp rtamazon media upload --remaining - Also, you can put the limit to the media while uploading ( This can come handy if you want to upload some specific number of media to the S3 bucket )
Note : The--limitparameter requires to use--remainingparameter# wp rtamazon media upload --remaining --limit=10
The rtAmazon-S3 CLI is under development. There will be many more commands will be coming in the future releases.
Privacy Options
Added in rtAmazon-S3 version v1.5.3.
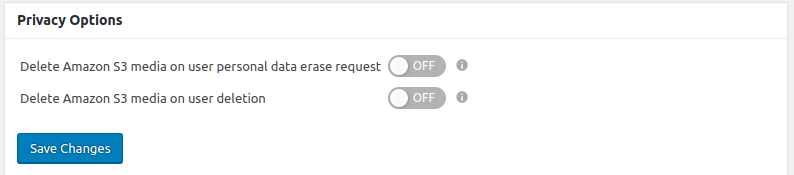
Allow user to delete media stored in S3 bucket on WordPress Personal Data Erase request and User Deletion with “Delete all content” option.
You can find this on settings page of rtAmazon-S3 admin section.
Developers
You can visit the hooks available with this addon from here .
You must be logged in to post a comment.