- Once you complete the purchase, you will get a download link for rtMedia Premium zip in your email inbox.
- After installing the rtMedia Premium and activate the plugin by configuring the license key received in email.
- Set the Membership options under rtMedia -> Settings.
Settings (Site Admin)
As a site admin, you can use a range of settings to help you organise memberships to your website.
Membership

- Go to
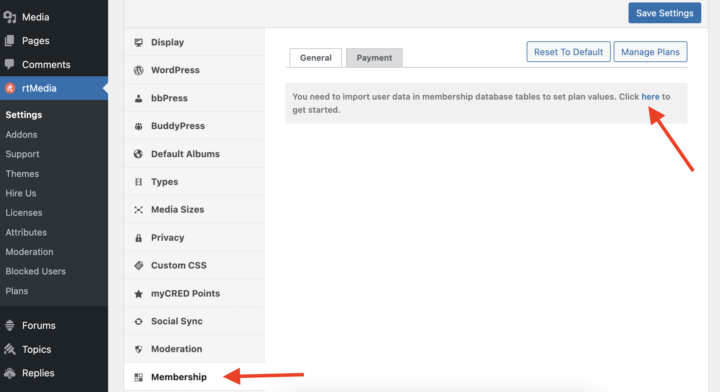
rtMedia > Settings > Display > Membership. - Enable the Membership feature and click on Save settings, once this is enabled you will see Membership tab in the sidebar.
- Click the link, as shown in below image, to import user data in membership database tables.

Import Plans and Calculate Media Data
 1. Choose either Yes or No to calculate previously uploaded user data or not. 2. Click Start to begin the import. 3. After import , click the link as shown below, to navigate to Membership Settings.
File and Upload Limits
- General Settings for Membership plugin
- A value of -1 means Unlimited and 0 means No Access.
- Set Upload Limit in MB on Daily, Weekly, Monthly, Yearly and Lifetime basis. These upload limits can be set differently for each Membership plan.
- Similarly, set File Limits for each membership plan.
- Manage plans will take you to another page that allows you to add new plans or modify existing ones.
- Click the link to recalculate the number of files and the upload data used by each user.
- After all the changes are made, apply them by clicking Save Settings.
Payment Settings
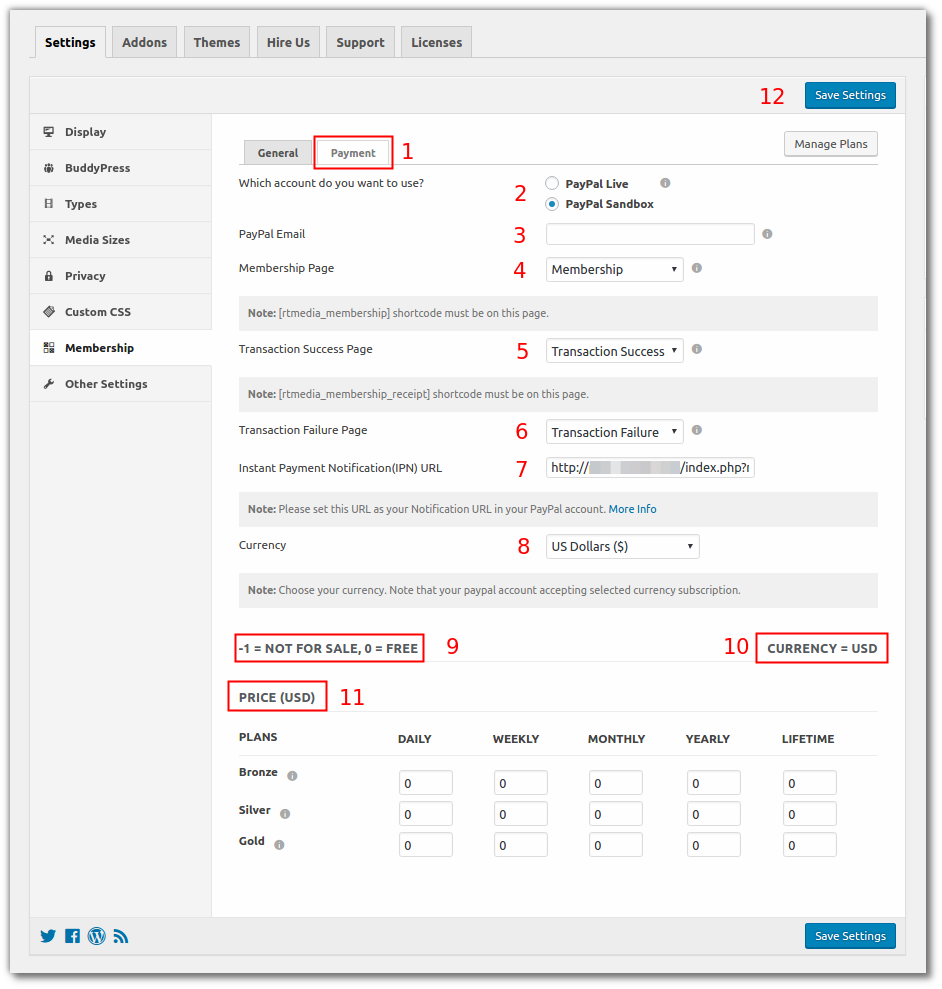
- Payment Settings for Membership plugin
- Option for selecting PayPal Live for live PayPal account or PayPal Sandbox for PayPal testing account.
- Enter your PayPal account’s email address here.
- Select Membership Table Page from the listing. Note: [rtmedia_membership] shortcode must be on this page. When membership plugin is activated , this page will be created automatically.
- Select Transaction Success Page from the listing. Note: [rtmedia_membership_receipt] shortcode must be on this page. When membership plugin is activated , this page will be created automatically.
- Select Transaction Failure Page from the listing. When membership plugin is activated , this page will be created automatically.
- Set this IPN URL to your Notification URL in your PayPal Profile Settings. To know how to set your Notification URL, click here.
- Choose your currency from the drop-down.
- The values of -1 = Not for Sale and 0 = Free. When set to -1 it means that the plan is NOT for sale. The subscription button will be disabled for the plan. When set to 0, the plan is free and the user will be subscribed without being redirected to pay with Paypal.
- Currency is in USD.
- You can set Prices in USD on Daily, Weekly, Monthly, Yearly and Lifetime basis. These prices can be set differently for each Membership plan.
- Click Save Settings to save and apply the settings.
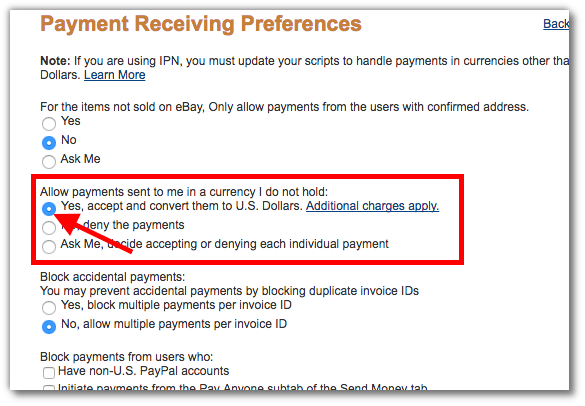
If you are using multi currency option for paypal. Please set `Payment Receiving Preferences` as described in below screenshot.

Note: Please refer document for further details – https://www.paypal.com/selfhelp/article/FAQ2406/1
Recalculate user data
Recalculate user data forcefully if you want to include previously uploaded media data for upload quota calculation.
Example: If you set media file count to 10 on a daily basis and a user has already uploaded 9 media files and now subscribes to that daily plan, then the user will only be able to upload 1 media file today.
Manage Plans
Click Manage Plans on the top-right corner to add plans or modify existing ones.
Add a plan according to the following steps.
- Enter a name for the plan.
- Add a description of the Membership plan.
- Select a color for the plan. If you prefer, you can add CSS color code directly.
- Click Add New Plan to create the plan. The plan is then displayed on the list at the right.
Update Plans
- You might want to modify the default plans that we have. You can check for additional options by clicking Screen Options.
- Click Edit or Quick Edit to make changes to the user plans. Clicking Delete will remove the user plan.
Edit Plan
- Edit Plan
- Enter any Name for the plan. Plan names should be unique.
- Enter any Description for the plan.
- Select a Color for the plan.
- Set the Upload Limit. Remember -1 means Unlimited and 0 eans No Access.
- Set the File Count. Remember -1 means Unlimited and 0 means No Access.
- Enter the plan Prices. Remember -1 means the plan is NOT for sale and 0 means Free.
- Click Update to save and apply the changes.
View Members Plan & Limit
- Manage membership for individual users by looking them up under Users on the WordPress Dashboard.
- View plans & limits subscribed by the members.
View Plan Details of User
Site Admins can view the plan details of other members and their own.
Edit Members Plan & Limit
- Manage membership for individual users by looking them up under Users on the WordPress Dashboard.
- Select Users of which plan & limit you want to change.
- You can Add Users To or Remove Users From different plan & limit.
- Select Plan
- Select Limit
- Click Update
Edit Plan Details of User
- Select Plan
- Select Limit
- Enter Upload Limit value in MB
- Enter No. of Files
- If you want to allow Plan’s Default value then you need to check this checkbox.
- You can go to Plan Listing Page from here.
Features (Users)
Membership Plans
Click the Membership option to display all the available Membership Plans.
PayPal Redirection Page
PayPal
Single Payment (Lifetime)
PayPal Login Screen
Users will see a screen like the one shown above and need to login to PayPal to proceed.
PayPal Payment
Payment Successful
After succesful payment , users will see a similar image as below :
Subscription Payment (Daily, Weekly, Monthly, Yearly)
PayPal Login Screen
PayPal Payment
Payment Successful
Transaction Successful Message
Transaction Failure Message
Membership Plan After Subscription
- Click the Membership option.
- Subscribed text will be shown for the members of that plan.
Upgrade Plan Manually
Currently there is on option to automatically upgrade plan to higher level. Once user subscribed to one plan and paid via PayPal, they can’t update automatically to another plan.
Only solution is, use first need to unsubscribe from current plan and disable PayPal recurring payment and then subscribe to other needed plan.
Steps:
- Cancel already subscribed plan from PayPal account.
- Subscribe to new plan and another recurring PayPal profile start.
Plan Values on BuddyPress Profiles
Subscribed plan limits will be displayed in Members Profile Pages.
Messages Displayed to End Users
There are a number of messages that are displayed to end users. Here are some examples.
Message in Activity When Not Subscribed to Plan
Message in Media Gallery When Not Subscribed to Plan
Message in WordPress Comment When Not Subscribed to Plan
Message in Forums When Not Subscribed to Plan
File Count Limits Surpassed in Activity
When you set the limits, users will not be allowed to upload media beyond that limit.
File Count Limits Surpassed in Media Gallery
File Size Limits Surpassed in Activity
Files exceeding the upload size limit are rejected.
File Size Limits Surpassed in Media Gallery
Displayed Messages to End Users (rtMedia Restrictions)
These messages are only shown to users using rtMedia Restrictions.


You must be logged in to post a comment.